


Google Photos for image sharing is tough to beat. Besides seamlessly photo-sharing, the app is completely integrated with various social media sites. Google Photos makes it simple to add photos and share them with other users.
In this article, the main highlight is how you can add Google Photos to a Facebook album, with a few tips and techniques on using different sharing options. You may not be aware, but you can also share Google Photos to Snapchat!
About Google Photo Sharing
There are essentially two ways to add Google photos to an album on Facebook. One way is by using the browser on your desktops, and the other is through the Google Photos app. The steps to follow are slightly different. Hence, we will tell you in detail about both.
Browser option
Start your preferred browser, sign in to your Google account, and select Photos from the drop-down option. Locate the images you want to share on Facebook and tap on the checkmark icon in the upper left corner of your screen.
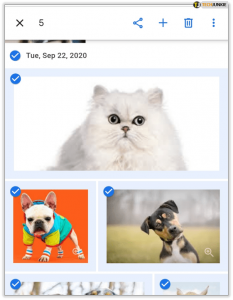
Please keep in mind that once you click on an image, it will bring up the thumbnail in full-screen mode. If you want to add a single image to a Facebook album, do this.
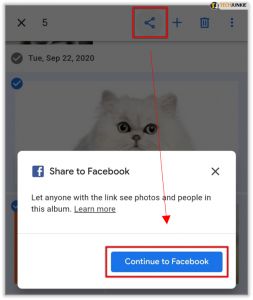
Repeat for each photo that you would like to share, and then select the share icon, which is the first option on the right. In the pop-up window, click the Facebook icon and select “Continue to Facebook.”
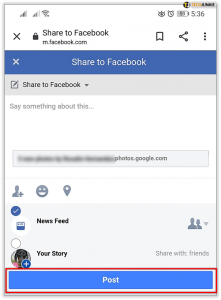
Next, select “Share to News Feed or Story” as the sharing destination and click on “Post.” There is one limitation, though; you cannot add images to an existing album on your account through this method.
App option
The “Google Photos” app outperforms its browser counterpart when it comes to uploading images to Facebook. To be more specific, you can select which album you would like to upload photos to. Here’s what you should do.
Please remember, this particular way is tested on iPhone 6S+ that runs on iOS 13. The app layout may differ on Android versions, but the steps to be taken are almost the same.
Open the app and browse through the images that you want to use. Click the three dots to make the pop-up window appear and click on “Select”.

Tap the images you want to include, after which you need to simply press the share/upload button (the first option in the screen’s upper right corner). From the pop-up window, select “Share to” and thereafter click the Facebook icon. iPhone users may not be able to pinpoint the icon in the standard carousel menu.

In that case, tap “More”, then scroll down to Facebook under “Suggestions” and click it. You can share Google Photos to Slack, Snapchat, LinkedIn and other messaging apps from the same menu.
When the Facebook sharing windows appear, tap on “+ Album” and choose the album to which you want to add photos. Yeah sure, you can easily add captions and specify who will be able to see the new pictures.
More options
Like we mentioned, you will be able to add Google photos in an email and share such images with your buddies or contacts. The steps to follow are pretty much similar to what we do in the case of browsers, and therefore, we will not cover separate sections for both.

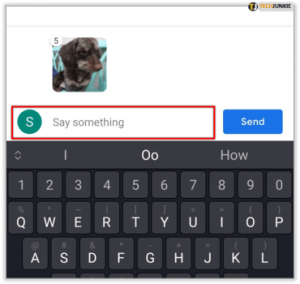
Simply find the images that you would like to use, select them and just tap the share button. The pop-up window will appear and specify a list of your most recent contacts, or you can also type an email address in the recipient section.
Upon selecting the recipients, you have the option to write a note in the “Say something” section. The receiver will get an email with an album or image preview, and one-click will take the receiver to Google Photos to view/download or simply edit the photos.
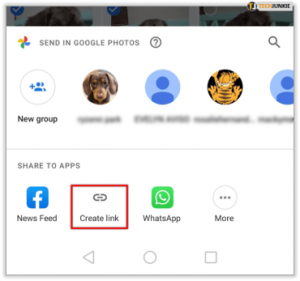
Besides the email-sharing method, another useful way is the “Create link” option. It will automatically generate a link with all your selected photos, and it is very easy to copy the link to your clipboard. You can then share this link with your contacts/buddies using an email, text messages, or any other way that you deem fit.
Will you be able to add a Facebook Album to Google Photos?
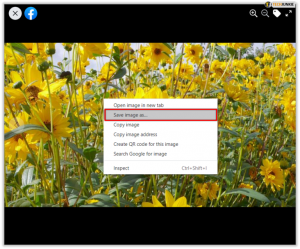
Great news; the answer is yes! However, it may take a little more time than you’d expect. With that said, you can right-click on individual images from FB albums, pick “Save as”, and upload them to the Google Photos app.
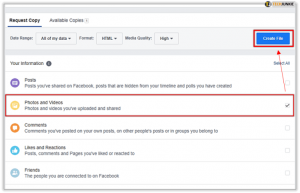
There’s another way to do this! Click on “Download Your Information” on Facebook. Tap the arrow down button in the upper right corner of your screen and pick “your Facebook Information” from the menu located on the left. Select “Download Your Information”, deselect everything else apart from images and videos, and then select “Create File”.
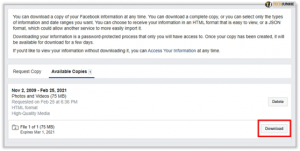
A few minutes later, FB will notify you that your files are ready for download. All you need to do is hit “Download” and open the zip file. Now open your Google Photos app, click the upload icon and pick “Computer”. Find the image file that you just downloaded from FB, and select the photos/albums that you want to upload.
How do you typically upload photos to Facebook? Have you made an album that everyone loves? What was the highest number of likes that your album received? Let us know your thoughts and experience using the comments section below.